Tinted windows not only enhance the appearance of your vehicle but also provide multiple benefits, such as privacy, protection from UV rays, and improved fuel efficiency. However, the formation of bubbles under the tint can diminish these benefits and compromise the overall aesthetics of your car. This comprehensive guide will delve into the causes of bubbles in tinted windows and provide step-by-step instructions on how to effectively fix them, restoring the clarity and elegance of your vehicle.

Image: nuvisionsolutions.com.au
Understanding the Causes of Bubbles in Tinted Windows
Bubbles in tinted windows are primarily caused by improper installation or age-related factors. During installation, air pockets can get trapped between the tint film and the glass, leading to the formation of bubbles. Over time, exposure to heat and moisture can weaken the adhesive holding the tint in place, allowing air to penetrate and create bubbles. Other factors such as improper cleaning, contamination of the glass surface, or external impacts can also contribute to bubble formation.
Materials and Tools Required
- Lint-free microfiber cloths or towels
- Glass cleaner
- Sharp blade (e.g., razor blade, straight razor)
- Heat gun or hairdryer
- Squeegee or credit card
- Small syringe with needle
- Pre-mixed tint adhesive or superglue
Step-by-Step Guide to Fixing Bubbles in Tinted Windows
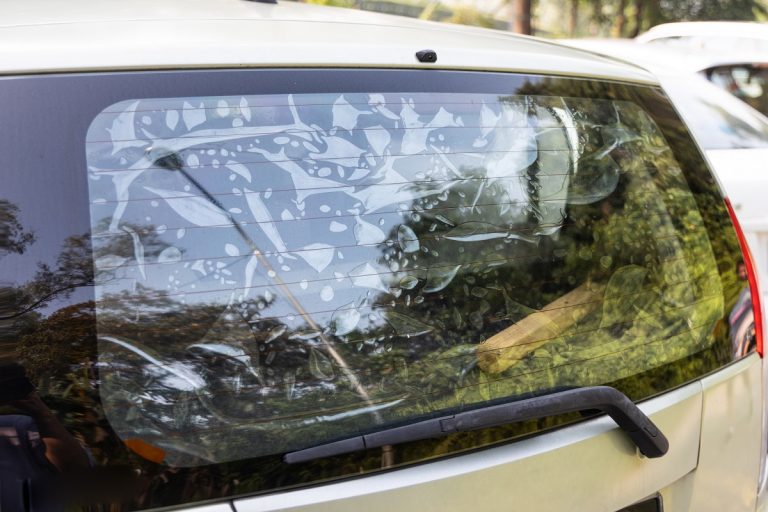
Image: autobossvaughan.com
1. Cleaning and Preparation
Thoroughly clean the affected area of the window with glass cleaner and a lint-free cloth to remove any dirt or debris. It is crucial to work in a clean environment to prevent further contamination.
2. Identifying the Location of Bubbles
Inspect the tinted window carefully under direct sunlight or a strong light source. Bubbles will appear as small circular distortions or air pockets trapped beneath the tint film. Mark the location of each bubble with a small piece of tape or a marker.
3. Applying Heat
Using a heat gun or hairdryer set to a low-to-medium temperature, gently heat the bubble for a few seconds. Avoid excessive heat, as it can damage the tint film. The heat will soften the adhesive, making it easier to remove the bubble.
4. Squeegeeing or Smoothing
Gently use a squeegee or the edge of a credit card to smooth out the bubble from the center towards the edges. Apply even pressure to push the air pockets out from under the tint film. If the bubble is small, you may be able to use your finger to smooth it out.
5. Injecting Adhesive (Optional)
For stubborn bubbles that do not respond to heat and squeegeeing, you can inject a small amount of pre-mixed tint adhesive or superglue into the bubble. Use a small syringe with a needle and carefully insert it into the bubble to inject the adhesive. Avoid injecting too much, as this can create a lump under the tint.
6. Re-heating and Smoothing
After injecting the adhesive, gently reheat the area with the heat gun or hairdryer to activate the adhesive. Use the squeegee or credit card to smooth out the bubble and remove any excess adhesive that may have oozed out.
7. Final Cleanup
Once the bubbles have been removed, use a clean microfiber cloth to gently wipe down the window and remove any remaining adhesive or residue. Allow the window to dry completely before rolling it up or exposing it to moisture.
Tips for Preventing Future Bubbles
- Proper Cleaning: Ensure that the glass surface is immaculately clean before installing the tint film. Any dirt or debris can create imperfections and lead to bubble formation.
- Expert Installation: Seek professional installation services from reputable tint shops. Experienced technicians have the techniques and tools to minimize the risk of bubbles during installation.
- Quality Tint Film: Opt for high-quality tint film with a strong adhesive backing. This will help prevent the film from lifting or peeling, reducing the chances of bubbles developing.
- Proper Aftercare: Avoid rolling up the windows or exposing the tint to moisture for several days after installation. This will allow the adhesive to cure completely and prevent bubble formation.
- Regular Inspection: Periodically inspect your tinted windows for signs of bubbles. Promptly address any small bubbles to prevent them from growing or spreading.
How To Fix Bubbles In Tinted Windows
Conclusion
Fixing bubbles in tinted windows requires attention to detail, patience, and the right techniques. By following the steps outlined in this comprehensive guide, you can effectively remove unsightly bubbles, restore the clarity of your tinted windows, and enhance the aesthetics of your vehicle. Remember, if you encounter any difficulties or have concerns about damaging the tint film, don’t hesitate to seek professional assistance from a qualified tinting specialist. By investing the time and effort to fix bubbles, you can maintain the value of your vehicle and enjoy the benefits of tinted windows for years to come.
